ShreadOS destroys your old PC's data more thoroughly than a hammer ever will — Umair Khurshid is a technology writer and developer with a strong focus on Linux, FreeBSD, cloud infrastructure, and automation. Before focusing on writing, Umair worked as a developer and DevOps engineer building and automating cloud-native systems.
Deleting files is easy, but making sure those files cannot be recovered later requires a different approach. A normal file deletion operation usually removes filesystem references while leaving the underlying data in place. That allows operating systems to delete files quickly, but it also means recovery software can sometimes retrieve information from previously used storage space.
ShredOS is a small Linux distro designed for securely erasing storage devices without worrying about someone recovering your data.
ShredOS is a lightweight Linux distro designed specifically for wiping storage devices. Instead of installing it on a hard drive like a normal operating system, you boot it from a USB drive. Once it starts, ShredOS launches a disk-wiping utility that detects the storage devices connected to the computer and presents them in a simple interface.
That makes ShredOS useful when an old drive or computer is being sold, donated, recycled, or simply retired. The existing operating system does not need to work because ShredOS runs independently of the storage device being erased.
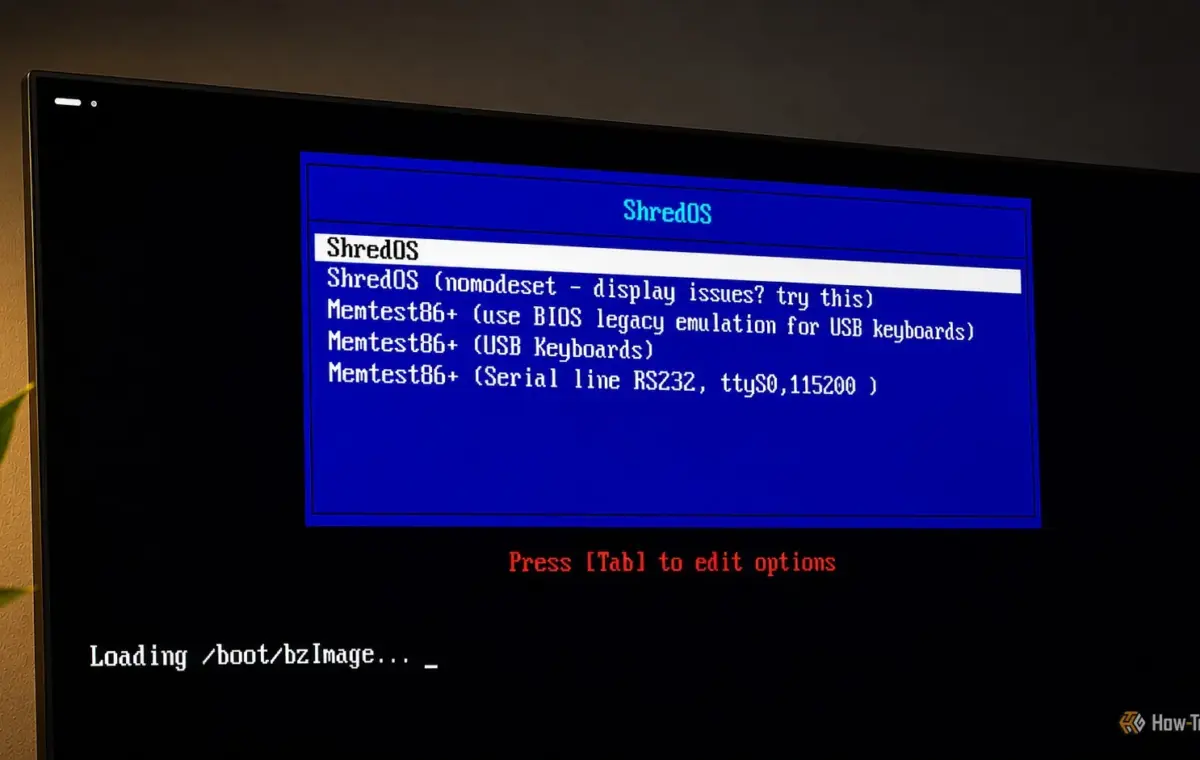
To install ShredOS, simply download the ISO image and flash it to a USB drive. After selecting the USB drive from the boot menu, ShredOS displays its startup screen. The menu includes the standard ShredOS entry along with options such as a nomodeset variant and Memtest86 entries. After selecting ShredOS, the system loads its Linux environment and starts nwipe.
Your USB drive should be able to store and boot as many operating systems as its storage capacity allows.
The main nwipe interface is a text-based screen divided into several areas. The top section shows the current wiping configuration and statistics, while the larger section lists detected disks and partitions. The drive list is where the most important decisions take place. Each device has identifying information such as its Linux device name, interface, capacity, manufacturer, model, and serial number.
That information should be checked carefully before selecting a drive. The bottom of the screen also shows the available keyboard controls. s starts the wipe, m changes the method, v changes verification, r changes the number of rounds, and the spacebar selects a device.
The Options section shows settings such as the entropy source, PRNG, wiping method, verification mode, and number of rounds.
ShredOS supports several methods through nwipe. These include simple patterns such as Zero, One, and Random, along with established multi-pass methods such as DoD Short, DoD 5220.22-M, and Gutmann (it's way too old). The interface can also show methods such as HMG IS5 Enhanced, depending on the version and configuration. The practical difference is the way data is written during the wipe. Zero writes zeros, One writes 0xFF, Random uses generated random data, while multi-pass methods perform several defined writing operations.
With how far we've come in consumer technology, haven't we outgrown ejecting drives?
There is no need to spend most of the wiping process debating these choices. For a conventional mechanical drive being prepared for ordinary resale or disposal, a complete overwrite with verification is generally a sensible approach. The selected method appears in the Options panel, so it can be checked before the operation begins.
When nwipe first displays the storage devices, the drives are listed without a wipe selection. Move the cursor to the drive that needs to be erased and press the spacebar. The interface marks the selected device with a [wipe] indicator. Once the correct drive is selected, review the device information again.
The bottom of the nwipe screen shows s=Start. Pressing s begins the operation for the selected device. At this point, the process becomes visible through the Statistics section. Information such as runtime, remaining time, throughput, load averages, retries, and errors can appear while the drive is being processed. The time required depends on the drive’s capacity, connection speed, and selected method.
Umair Khurshid is a technology writer and developer with a strong focus on Linux, FreeBSD, cloud infrastructure, and automation. Before focusing on writing, Umair worked as a developer and DevOps engineer building and automating cloud-native systems.
Deleting files is easy, but making sure those files cannot be recovered later requires a different approach. A normal file deletion operation usually removes filesystem references while leaving the underlying data in place. That allows operating systems to delete files quickly, but it also means recovery software can sometimes retrieve information from previously used storage space.
ShredOS is a small Linux distro designed for securely erasing storage devices without worrying about someone recovering your data.
ShredOS is a lightweight Linux distro designed specifically for wiping storage devices. Instead of installing it on a hard drive like a normal operating system, you boot it from a USB drive. Once it starts, ShredOS launches a disk-wiping utility that detects the storage devices connected to the computer and presents them in a simple interface.
That makes ShredOS useful when an old drive or computer is being sold, donated, recycled, or simply retired. The existing operating system does not need to work because ShredOS runs independently of the storage device being erased.
To install ShredOS, simply download the ISO image and flash it to a USB drive. After selecting the USB drive from the boot menu, ShredOS displays its startup screen. The menu includes the standard ShredOS entry along with options such as a nomodeset variant and Memtest86 entries. After selecting ShredOS, the system loads its Linux environment and starts nwipe.
Your USB drive should be able to store and boot as many operating systems as its storage capacity allows.
The main nwipe interface is a text-based screen divided into several areas. The top section shows the current wiping configuration and statistics, while the larger section lists detected disks and partitions. The drive list is where the most important decisions take place. Each device has identifying information such as its Linux device name, interface, capacity, manufacturer, model, and serial number.
That information should be checked carefully before selecting a drive. The bottom of the screen also shows the available keyboard controls. s starts the wipe, m changes the method, v changes verification, r changes the number of rounds, and the spacebar selects a device.
The Options section shows settings such as the entropy source, PRNG, wiping method, verification mode, and number of rounds.
ShredOS supports several methods through nwipe. These include simple patterns such as Zero, One, and Random, along with established multi-pass methods such as DoD Short, DoD 5220.22-M, and Gutmann (it's way too old). The interface can also show methods such as HMG IS5 Enhanced, depending on the version and configuration. The practical difference is the way data is written during the wipe. Zero writes zeros, One writes 0xFF, Random uses generated random data, while multi-pass methods perform several defined writing operations.
With how far we've come in consumer technology, haven't we outgrown ejecting drives?
There is no need to spend most of the wiping process debating these choices. For a conventional mechanical drive being prepared for ordinary resale or disposal, a complete overwrite with verification is generally a sensible approach. The selected method appears in the Options panel, so it can be checked before the operation begins.
When nwipe first displays the storage devices, the drives are listed without a wipe selection. Move the cursor to the drive that needs to be erased and press the spacebar. The interface marks the selected device with a [wipe] indicator. Once the correct drive is selected, review the device information again.
The bottom of the nwipe screen shows s=Start. Pressing s begins the operation for the selected device. At this point, the process becomes visible through the Statistics section. Information such as runtime, remaining time, throughput, load averages, retries, and errors can appear while the drive is being processed. The time required depends on the drive’s capacity, connection speed, and selected method.
Written by https://futureknowledge.in/ | Source: www.howtogeek.com
Written by https://futureknowledge.in/