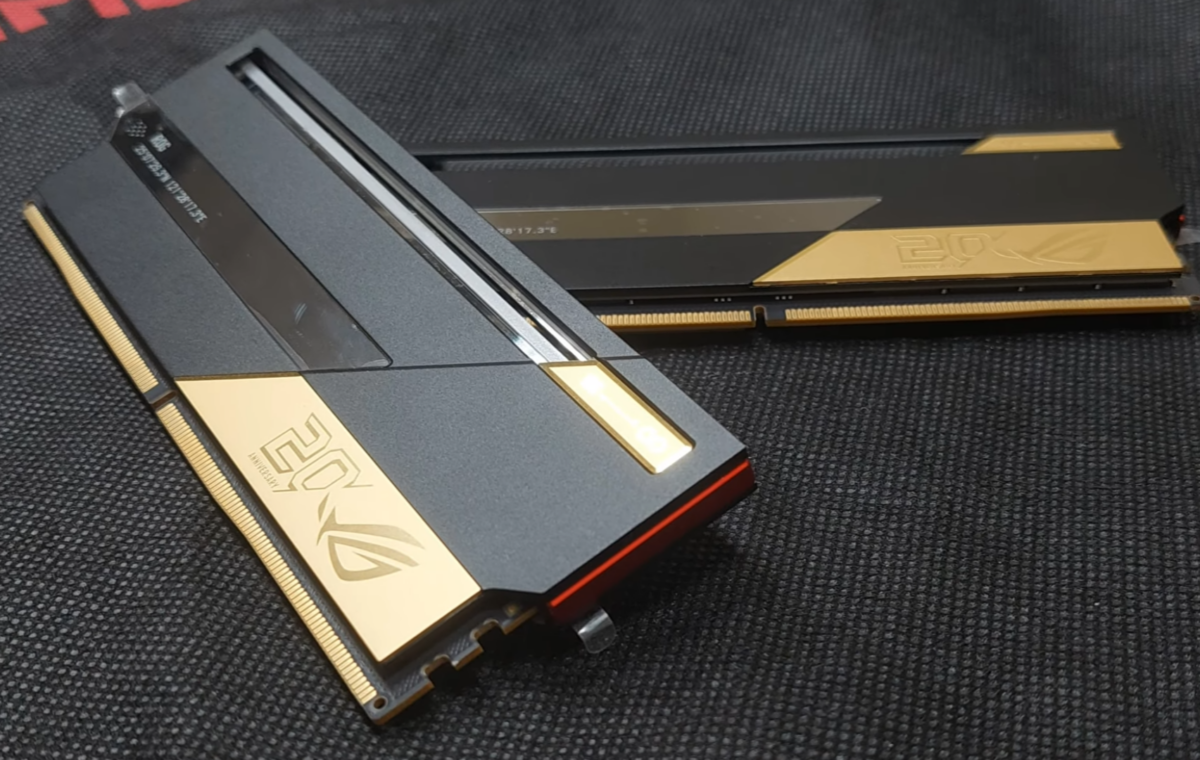
There has been a severe memory shortage for months. The main reason for this is the AI boom: large portions of DRAM production are being diverted to data centers and AI accelerators, leaving traditional PC manufacturers to struggle with rising prices.
According to data from TrendForce, prices for traditional DRAM rose by around 90 percent in the first quarter of 2026, depending on the segment. HP recently stated that RAM and SSDs now account for around 35 percent of a PC’s material costs – previously, this figure hovered around 15 to 18 percent.
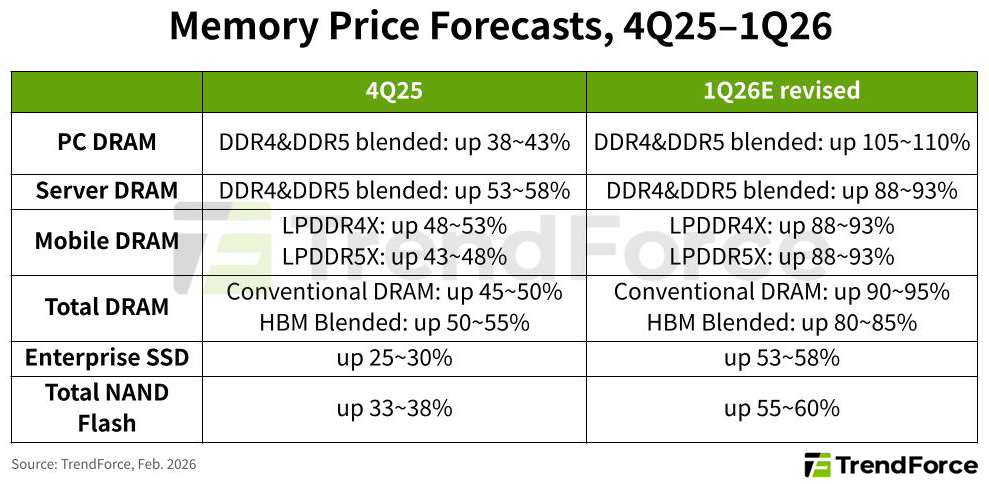
TrendForce
No one currently expects the market to stabilize any time soon. Industry analysts, on the contrary, anticipate that memory prices will remain high until at least 2027. Anyone currently buying a new PC or looking to extend the life of their existing machine with a RAM upgrade will need to budget significantly more money.
If a purchase or upgrade is no longer viable within your budget, tuning tricks can help make optimal use of the available memory, allowing you to carry on with 8 or 16 GB of RAM.
Check how much RAM your PC can actually use
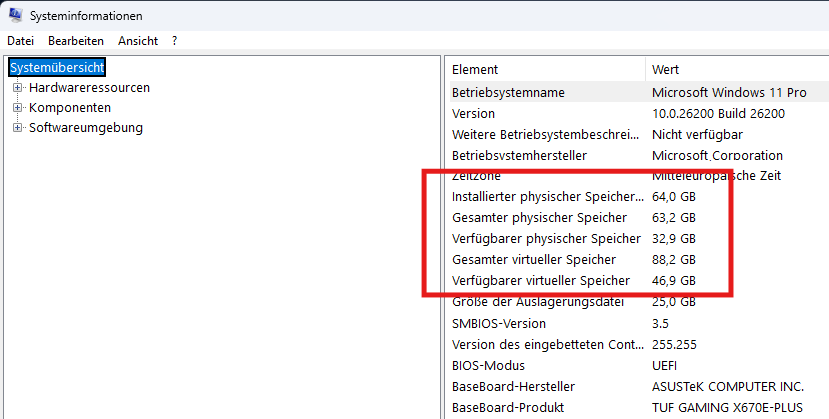
The first step towards an optimized system is a precise diagnosis of your current hardware. This allows you to determine how much of the installed memory the computer is actually permitted to use. This information can be found in the Windows System Information.
You can open this by pressing the Win-R key combination and entering the command msinfo32 in the Run window. In the opened program, look for the RAM details in the right-hand column.
The total capacity is shown as “Installed physical memory (RAM).” More important is the entry under “Total physical memory,” which shows how much Windows and programs are actually allowed to use.
The figure under “Total virtual memory” shows the sum of physical RAM and the paging file.
Friedrich Stiemer
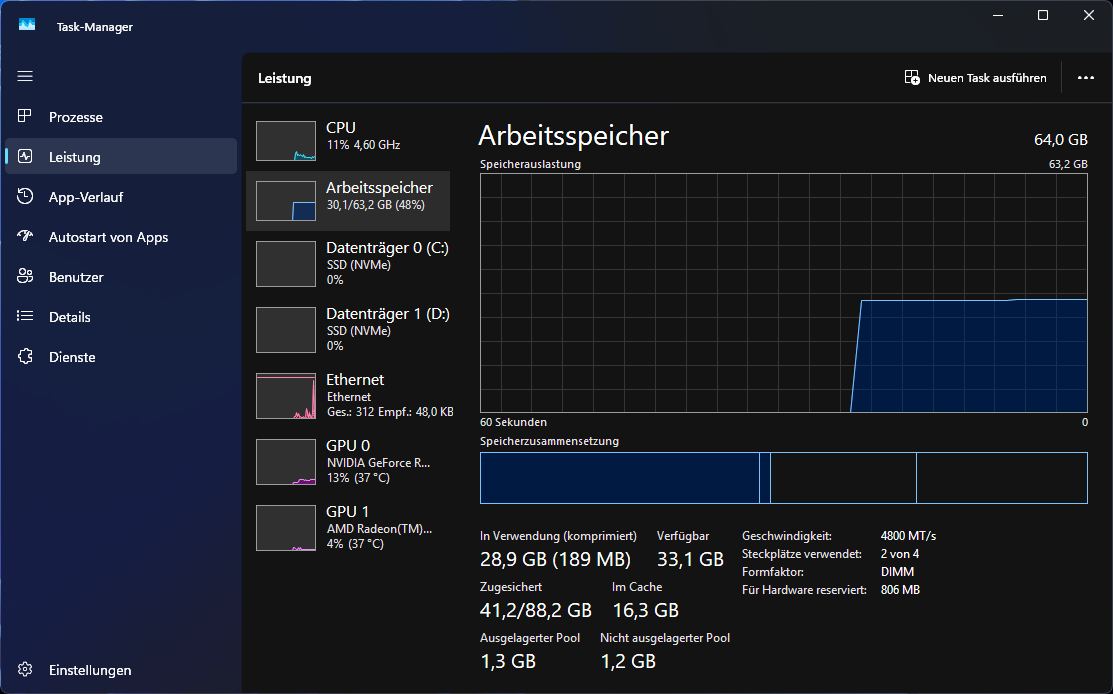
Further information on RAM configuration and usage is provided by the Task Manager. You can launch it using the Ctrl-Shift-Esc key combination and switch to the “Memory” tab in the “Performance” menu.
Pay attention to the display at the bottom, right below the graph. There you will find a value under “Reserved for hardware.” This can be several hundred megabytes or over a gigabyte and it refers to the memory used by the processor’s integrated graphics card.
.
Friedrich Stiemer
Another important indicator is the “Committed” figure, which is usually displayed in a format such as “10.5/24.3 GB.” The first number indicates the total amount of memory currently requested by all programs, while the second number marks the absolute limit. If the first number approaches this limit, the system becomes unstable and will likely crash.
Optimize RAM via hardware checks and UEFI settings
The built-in memory only helps your PC if it’s working properly. You should check whether the RAM has any faults before applying any optimization measures. The quickest way to do this is using the built-in tool “mdsched.exe” in the Start menu.
Select “Restart now and check for problems” to thoroughly test the RAM during the boot process. This Windows check subjects the memory to various test patterns to verify the physical integrity of each cell.
This procedure is useful for assessing major defects and analyzing frequent crashes. However, if you want to go into more depth, you should use the free program MemTest86. This allows you to detect sporadic errors or errors occurring under extreme load.
If the memory is working without errors, check whether it’s running with optimal settings. This includes dual-channel mode, which doubles the theoretical bandwidth and provides a massive performance boost, especially on systems with integrated graphics.
Open the Task Manager and look under “Performance > Memory” for the entry “Slots in use.” If two modules are installed, it should say “2 of 2” or “2 of 4.”
Friedrich Stiemer
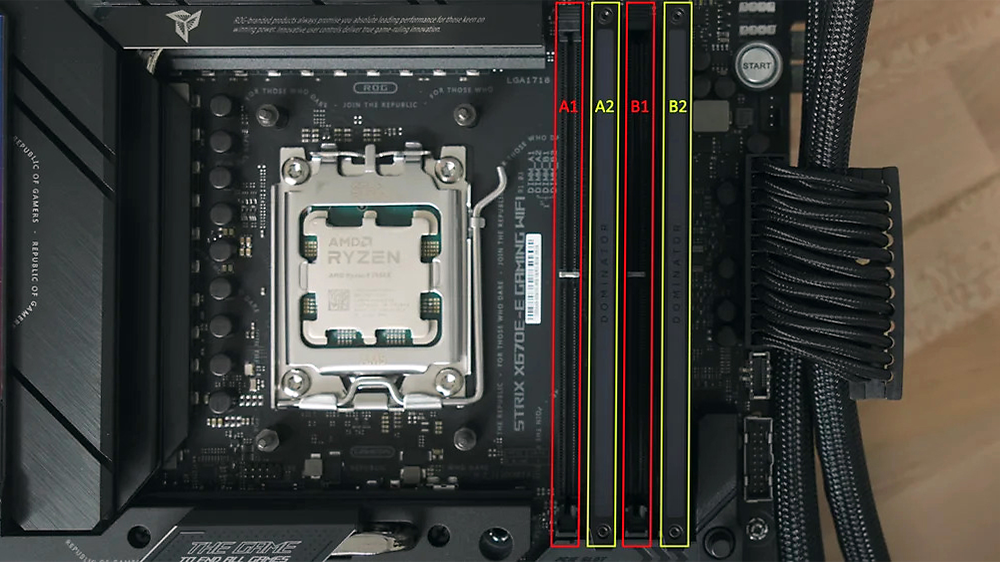
For absolute certainty, use the free tool CPU-Z. This tool explicitly displays “Dual” under “Channel” in the “Memory” tab when dual-channel mode is active. If it says “Single,” you must switch off the PC and swap the RAM modules around. For motherboards with four slots, it’s essential for signal stability and maximum speed to place the modules in slots 2 and 4. These are usually marked on the board as A2 and B2 or in identical colors.
The manual will tell you where to insert the memory modules in your PC for dual-channel operation. The correct arrangement minimizes signal reflections at the unused ends of the traces and is often a prerequisite for achieving high clock speeds stably.
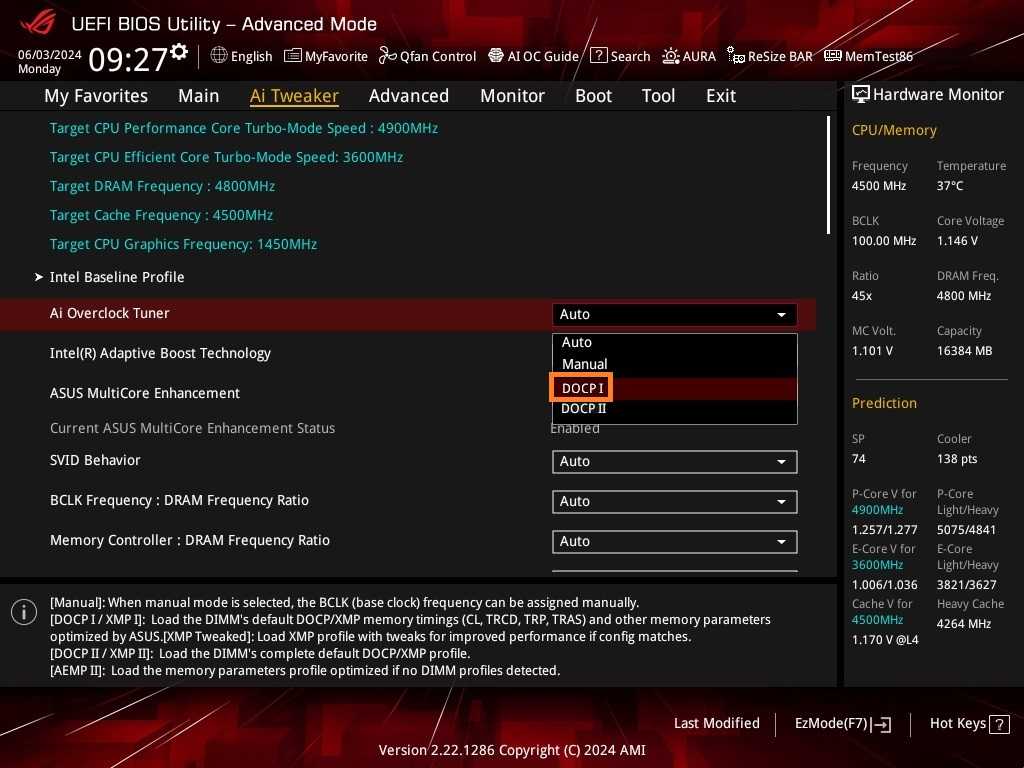
You can fine-tune the RAM speed in the UEFI settings. You can access these in Windows via “Settings > System > Recovery” and by clicking “Restart now” under “Advanced startup.” After rebooting, select “Troubleshoot,” “Advanced options,” and “UEFI Firmware Settings.”
Asus
Look for memory profile options in the settings. On systems with an Intel CPU, these are usually found under “XMP” (Extreme Memory Profile). On systems with an AMD CPU, you’ll find them under “EXPO” (Extended Profiles for Overclocking).
- On Asus motherboards, in the “Ai Tweaker” menu.
- On MSI, under “OC.”
- On Gigabyte, in the “Tweaker” tab.
- On ASRock, under “OC Tweaker.”
Enable the appropriate profile (usually “Profile 1”) to unlock the maximum speed and optimized timings. Otherwise, the memory will often run at slower default speeds. Save the changes using the F10 key and confirm the restart so the performance gains take effect.
Find and disable programs that consume too much RAM
Many programs that consume memory are not immediately obvious. Memory shortages during operation are often caused not by the software you are actively using, but by the background processes.
You should sort the running processes on your PC by their memory usage. To do this, open the Task Manager and click on the “Memory” section in the top row. Under “Name,” you will see the active programs listed by memory usage. The browser is often at the top, along with other open programs like your email client or Office software. However, mixed in are processes that do not belong to any specific software.
Friedrich Stiemer
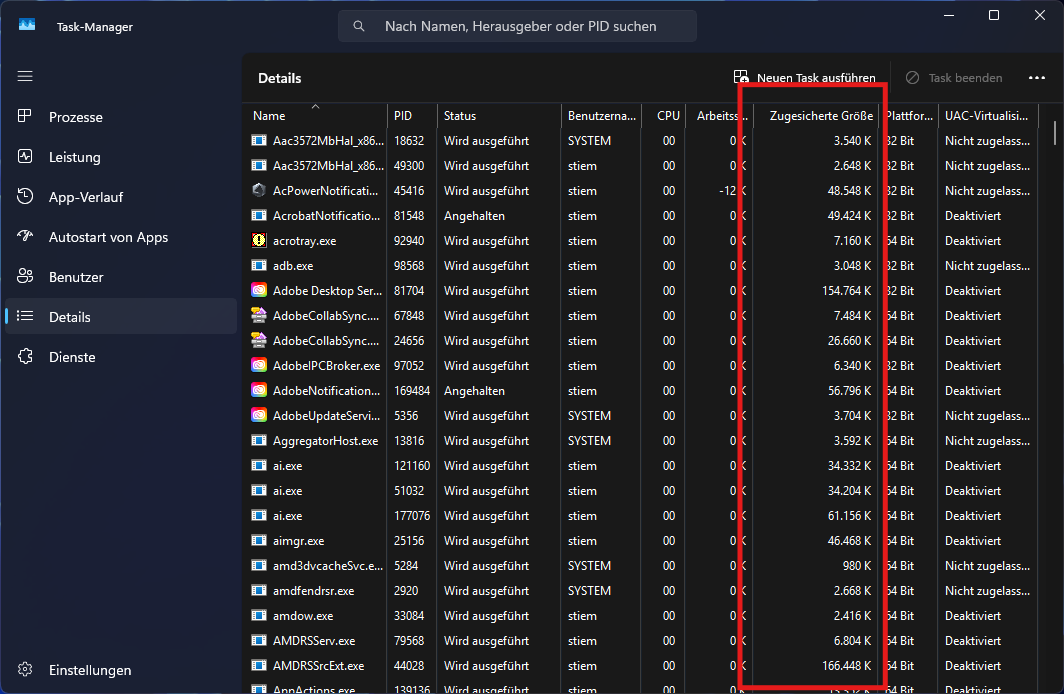
The “Details” tab, the penultimate icon in the left-hand column of the Task Manager, allows for a more precise analysis. To track down hidden reservations, right-click on any column header, select “Select Columns,” and tick the “Committed Size” box. This column now shows you the exact amount of virtual memory that a program has reserved – this is often far greater than the RAM currently in use.
To free up memory, you can also disable built-in features that constantly consume resources that are not essential for the PC’s operation. This includes, for example, the news and weather display in the taskbar. While informative, it constantly uses memory via the “Widgets.exe” process. You can turn them off by right-clicking the taskbar, then selecting “Taskbar settings” and disabling “Widgets.”
The same applies to search indexing, which catalogues your files in the background so you can find them more quickly. You can save RAM here by setting the mode to “Classic” in the Windows settings under “Privacy and Security > Search > Search My Documents.” You can also exclude folders from indexing by clicking on “Add folders to exclude” and selecting the desired directories in File Explorer. This saves RAM, but results in longer wait times when searching for files.
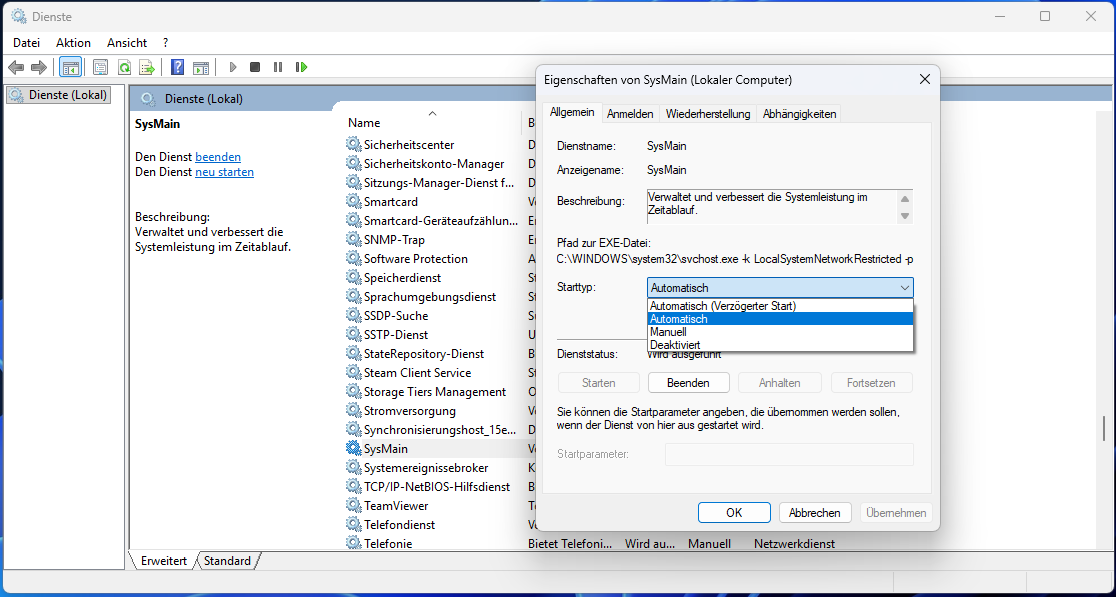
There are also services in Windows that can be disabled without any loss of functionality. You can launch the Services program by typing services.msc into the Windows search box. Then search for the entry “SysMain” and double-click to open its properties. Under “Startup type,” select “Disabled” from the drop-down menu.
This service, formerly known as Superfetch, analyzes programs and loads them into RAM in advance to speed up their launch. Disabling the service frees up memory. Apps may take a slightly longer time to load the first time they are opened after a restart.
Friedrich Stiemer
Reduce RAM usage in your browser and Windows
In everyday PC use, the browser usually takes up the most RAM. Here, too, you’ll find settings to reduce RAM usage.
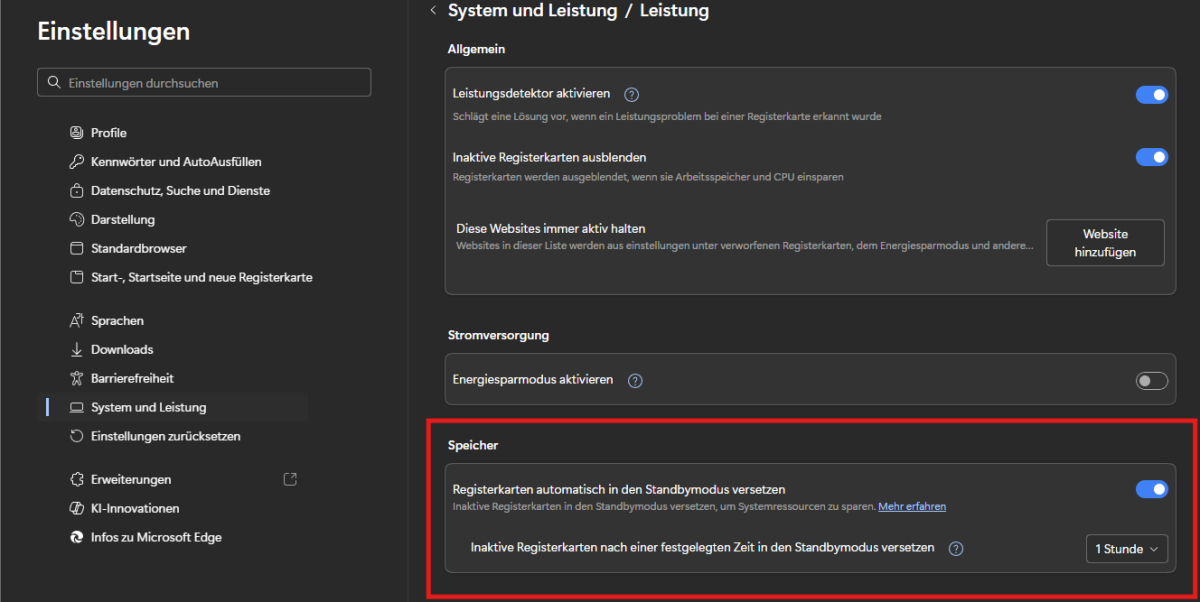
For example, you can enable the built-in power-saving features. In Edge, go to “Settings > System and performance” and look for the option “Automatically put tabs to sleep” in the “Performance” section. This feature freezes inactive tabs after a set time (one hour by default), which can reduce RAM usage by around 32 percent.
.
Friedrich Stiemer
In Google Chrome, go to “Settings” and “Performance” to enable “Memory Saver.” Chrome uses “Tab Discarding” here. The content of inactive tabs is removed from RAM and only reloaded when you click on them again.
Firefox users should enter about:config in the browser address bar and set the value of “browser.tabs.loadInBackground” to “false.” This prevents tabs opened in the background from taking up RAM. They are only loaded when you select them.
On Windows 11, disabling AI features frees up memory. Recall, for example, regularly takes snapshots of your screen to create a searchable history. This is handy, but it constantly consumes resources and poses privacy risks. To disable Recall, search for “PowerShell” in the Start menu, right-click the entry, and select “Run as administrator.” Now enter Dism/Online /Disable-Feature/Featurename:Recall.
You can disable Copilot in Windows 11 Pro via the Group Policy Editor, which you can launch by pressing Win-R and entering the command gpedit.msc. Navigate to “User Configuration > Administrative Templates > Windows Components > Windows Copilot” and set “Disable Windows Copilot” to “Enabled.”
On Windows 11 Home, open the Registry Editor via Win-R and the command regedit, confirm with “Yes,” and navigate to the left-hand directory tree. Follow the path “HKEY_CURRENT_USERSoftwarePoliciesMicrosoftWindows.”
If the “WindowsCopilot” subfolder is missing, create it by right-clicking on the Windows folder and selecting “New” and then “Key.” Then right-click in the right-hand pane, select “New,” then “DWORD (32-bit) Value,” and name it TurnOffWindowsCopilot. Double-click to set the value to “1” and this will permanently terminate the background processes after a restart.
Use the page file as a RAM safety net
If the system’s RAM runs low despite the optimization measures outlined above, the page file (pagefile.sys) on the SSD acts as a safety net. Never disable this file, as this will lead to instability and crashes.
To optimize the configuration, open the System Properties via Win-R using the command sysdm.cpl and navigate to the “Advanced” tab. Under “Performance,” click “Settings,” switch to “Advanced” in the new window, and select the “Change” button under “Virtual memory.”
Here, uncheck the box for automatic management and select your fastest SSD drive. Set the option to “Custom size” and enter the same value for both the initial and maximum size (around 1.5 to 3 times your RAM). This prevents Windows from having to dynamically increase the file size, which reduces the processing load and SSD fragmentation. Confirm by clicking “Set” and restart your PC.